I know and worked for the Biggest Diverter of Water In the Milky Way Galaxy! And this is not some alien from Marvel, DC, Star Trek, or any other alternate universe! How big is big? The numbers are, to borrow a word that I do know what it means: inconceivable!

When I was still a bureaucrat, overseeing the Watermaster Service Section at the Department of Water Resources in Red Bluff, I was helping a lady on Hayfork Creek whose water was disappearing from Hay Fork Creek. She said that a water truck operator was filling a hundred or more tanks a day (!) and it was drying up the creek so she and her senior citizen neighbors couldn’t divert their small domestic water rights. I had to tell her that this wasn’t part of our watermaster service, but I gave her the usual things to try: complain to the Water Board (since it was under their regulation), call your supervisor, call your legislator, talk to the local newspaper, call the TV station, start a protest…. The problem ultimately got resolved because the guy didn’t have a water right, and he had to pay a fine, get a permit, and take less water…for irrigating non-standard crops if you know what I mean.

While this was going on I did some searching of water rights with the Water Board’s eWRIMS database ( it was clunky but I sure liked it better than I do CalWATRS). I found a very large diversion, over 1 million acre-feet if memory serves. When I looked at the map I knew there had to be a mistake of some kind. I talked to someone at the Water Board – how do they reveal diversion amounts for reasonableness? Turns out they didn’t, and that helped make National News later on.
When I retired from the state, I looked into these numbers one day when I wasn’t doing anything else. The diverters were obviously upset and they knew the numbers were large, but what was going on? Then the 2018 news was fantastic! And in 2019 we read articles like “Trinity diverters reported using one trillion acre feet of water, more than all of the earth’s water.” Wow! How was someone even ABLE to report that?? But that’s not even the best part. They ended up reporting WAY more than a measly 1 trillion acre-feet – think quintillions of acre-feet. Unimaginable numbers. How much is that? Here is the Supplemental Statement filed for 2013, with values 1 followed by 18 zeroes, and 1 followed by 20 zeroes, even 1 followed by 21 zeroes. This is all public information but I won’t post any names, you can go look them up if you want to. Big BIG numbers:

Here’s that table with all the zeroes shown. Suspiciously large, exact, identical numbers. How does that happen?

In 2018, I looked up these diverters. They were in trouble with the Water Board, I wanted to meet them myself, and who knows, maybe I could actually help them since this is my business. I talked with the lady first, and asked, what happened?
She said, “Well, I tried calling the Water Board to ask, what kind of measurement device should I put in, and where can I buy one? The person I talked to said, ‘This is your water right, and it is up to you to figure out how to measure it, that’s not our job. Bye.’ So I was mad. They’re the experts, how can they treat people like that? I don’t want to get in trouble for not measuring. Then I thought, if they won’t help me, maybe I can get their attention by increasing my diversion amounts. I mean, I have no idea how much I am diverting, and they won’t help me even guess, so why not? So I put in 9 9’s in every box. No way they were going to miss that! Now instead of me getting no help, they’ll call me and you bet they’ll help because they don’t want bad numbers reported. Right?”
Except the Water Board did not notice. Still no help for our diverters. The next year, she called again. Different person, same response, even more rude. “That’s your job, not ours, and you have to figure it out. We don’t give advice.” Guess what happened next? Even bigger numbers!

By 2013, she entered a “1” and then held down the “0” key until she filled up each box. For some reason boxes could hold slightly different numbers of digits. She found the limits of what the system could do. I couldn’t stand it: “What happened next?” She says “Well NOW the Water Board noticed, because somebody saw our filing and called a newspaper. The Water Board people were embarrassed so now they were going to do something about it. We ended up in a room full of lawyers in Sacramento telling us how horrible we are, and we’re going to have big fines. I asked one of the lawyers, ‘How big is the leg on this table?’ He said, ‘What? What are you talking about?’ ‘Well, you are asking me how much water we actually diverted, but you can’t tell me how big a table leg is?’ That pretty much ended the meeting. Then there was the hearing, then they said we’d have to pay a $210,000 fine. We said, ‘Fine, you can have the property, it’s not worth that much.’ So they finally reduced it to $10,000 and all of that could be used to install a measurement device and fix our filings.”

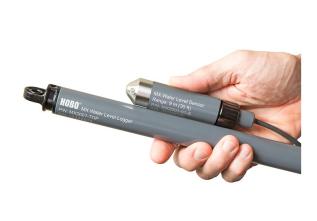
And that’s what they did. They hired me, and I and my son Devin went out and installed the device you see here. I also revised all of their Supplemental Statements to estimate more reasonable values – more like 1.3 acre-feet per year, with no zeroes. That pipe sure won’t hold 1,000,000,000,000,000,000 CFS. Not even 1 cfs, given the length and the slope of the pipeline.
So, how much water was reported in 2013? Well, the total volume was reported as 1,100,100,000,000,000,000,000 acre-feet. The volume of the Earth, if you calculate it with (4/3) * PI * R^3, is only 905,904,631,040,907,000 acre-feet. That means they reported diverting 1,214 EARTH-SIZED BALLS OF WATER IN A YEAR!! They were the biggest diverters in the whole Milky Way Galaxy!


 How is a staff gage installed in a reservoir? The typical way is to drive a piece of 2″ galvanized pipe into the ground, deep enough to so it isn’t easy to push over. If cattle will be in the reservoir to get water, then the pipe needs to be really well installed. A gas-powered post pounder can be rented at Rental Guys, Home Depot, or similar places.

 already attached has to be put in place and held vertical while being driven. If the total depth is greater than 6 feet, then a longer pipe, board, and staff gage will be needed, and the combined weight will be that much greater. Hint: tie a rope and buoy to the pipe so