Some Hope in Rain and Snow Totals

Here is some hopeful news for California water supply – rain and snow totals for the year are at or a little above average, for the Central Valley Basin – The Sacramento-San Joaquin bowl that happens to contain one of the world’s greatest breadbaskets and salad bowls.  This information is measured and reported by the California Department of Water Resources.

Northern Sierra Precipitation so far this year:

nsp8s1_20151227


Southern Sierra Precipitation so far this year:

ssp8s1_20151227


California Snow Water Content, so far this year:

CSWC_20151227


Chilean Water Rights at (darn near) the Driest Place on Earth

California seems like a big place to me – I live here.  However, to cover the land surface of earth would take 400 Californias.  There are other places of interest on this celestial ball, like Chile.  What’s amazing about Chile?  The following information comes from various sources and I have not fact-checked it all:

  • 1/3 of all the copper in the world is mined here.
  • Easter Island and its amazing, huge head statues are part of the country.
  • It is a very secure country for residents and tourists.
  • It’s in the Southern Hemisphere (I hope that wasn’t a surprise!)
  • The world’s smallest deer, the pudú, is from there.
  • The people are extraordinarily friendly to visitors.
  • It has the driest “non-polar” desert in the world.  Drier than Death Valley in California??  Yup, it is:  The Atacama Desert in Chile gets 1/25 (0.04″) of an inch of rain per YEAR on average.

It is that last fact, about the Atacama Desert, that makes an amazing story about water rights.  Amazing to me, and hopefully to you, too.

Map of Chilemap_of_chile[1]

In March of 2015, there were very unusual, heavy rains in the desert, and sadly, over 100 people were killed.  Several cities were hit with floods, including the place of interest for this post, the City of Copiapó.

Atacama Desert, by Evelyn Pfeifferimage

The ongoing, increasing problem is not floods, but lack of water.  Of course generations of Chileans have learned to live with that so they have water year-round.  However, recent increases in copper mining have required proportional increases in the use of water as part of the mining process.  (My mining expert friend Mark can correct me here if needed).

Ironically, in 1981, Augusto Pinochet, the formidable dictator, changed the water code so the government has much LESS control, so water rights are much more free market.  Not only can mining companies pay much more, up to $750,000 per acre-foot according to Copiapó city officials, but they can use water than runs on their own properties for free.  [An acre-foot is 43,560 cubic feet of water, or 325,851 gallons – 326,000 gallons near enough, and the amount used by 1 or 2 families per year.]  Given that mining companies have bought a significant chunk of farm land with water rights, that gives the companies the lion’s share.  The increased pumping and new city wells are pulling in more brackish or salty water, at the same time that there is much less water available.

City of Copiapó, ChileCopiapó_atardecer_de_Otoño (1)

In California, city residents might pay up to $4,000 per acre-foot of water, roughly speaking.  I know I’ll get corrected by more than a few people on that.  The highest-profit agriculture might pay up to $1,500 per acre-foot of water.  San Diego’s desalination plant that is being built right now, is expected to cost residents maybe $1,200 per acre-foot of use.

Thankfully, our State’s founders wrote us a good Constitution; it specifies that all water must be used reasonably and beneficially.  Human health and safety are the highest priorities.  Somehow, some way, water gets to 99.99% of people even in a severe drought.  In addition, California is one of the great breadbaskets of the world, even in a severe drought.  Folks, we are blessed in the State of California!  Go see some of the rest of the world, and it will increase your appreciation of our abundance of water, and even thankfulness for our confusing, multi-basis, and to some people “oudated”, water rights system in California.

Dunes of the Atacama, by Evelyn Pfeiffer

The photo above could be of the Anzo-Borrego desert in southeastern California, but it’s from the whole lot drier Atacama Desert in Chile.

From weir to orifice in only an hour

Orifice devices are needed for flat ditches, where the fall may be as little as 0.20′ (2.4″) from upstream to downstream.  An orifice is simply a hole through which water flows, so it can be accurately measured.  The photo below shows a submerged weir, flowing from right to left.  The water in the ditch downstream (left) is above the hole in the boards.Orifice_Side_Top_2 You already noticed the amazing thing about this orifice, didn’t you?  I could tell you are savvy that way.  Yes, this is the same Briggs Manufacturing weir box as the ones in the previous post!  It has the same 2″ lumber in the upstream board slot.  Now the flow goes through a precisely cut hole in the boards, with a known area, instead of over the top of the boards.

Staff_GageInstallation is just like with the weir boxes installed in the previous post, too.  For convenience, staff gages may be attached to one side of the box so it is quick to read the water depths.  So the precast concrete box is versatile, it can be used as both a weir and an orifice.  Actually, some ditches need both a weir and an orifice.  This is especially true in a ditch where a gate or boards may be put in the ditch below the weir box, to flood hay or pasture just below the measurement device.  All it takes is a change of a couple of boards.

WMM_Cover_small


The big difference in measuring the flow is that, instead of “sticking” the weir boards, now the depth of the water must be measured upstream and downstream to use a weir equation or table.  The “difference in head”, or water surface elevation, gives us a value needed to read the table or use an equation to figure out the flow.  What tables or equations?  These are out of the water measurement bible, the Water Measurement Manual.  We will discuss these very soon in following posts.

This was a quick post to show how you can get 2 uses out of one device, to make your life simpler.  That’s all for now, hope you had a Merry Christmas!


Weirs – Planning, Building, And Measuring Flows

Tomorrow is Christmas 2015!  Merry Christmas all.

Weirs are the least expensive permanent measurement device you can install.  Materials will cost the diverter in the range of $300 to $2,000; hiring the backhoe to set it in place probably costs more than the materials, unless the diverter already has a backhoe or crane.

The weir below was precast by Briggs Manufacturing in Willows.  The weir is a cast concrete, 3-sided box with board slots for 2″ lumber.  It’s pretty simple, and relatively easy to install.  This particular weirWeir_Showing_Board_Slotsneeded metal wing-walls to keep the dirt on the sides from washing out.  Note that there are two board slots on each side, one for the boards to slide in, and the other to help make sure a nappe or air gap is created as water flows over the boards.

Step one is determining if there is enough fall in head from upstream to downstream.  A weir needs 0.7 feet (0.7′), or 8.4 inches (8.4″) of fall to be sure it will work correctly.  The 0.7′ figure is because the pool of water needs to be a maximum of 0.45′ above the top of the weir boards on the  upstream side.  Then, the water in the ditch downstream of the weir needs to be at least 0.25′ below the top of the boards so the water flows freely, separating from the boards and having an air gap on the downstream side.  0.45′ + 0.25′ = 0.70′.Sticking_Weir_sharpened

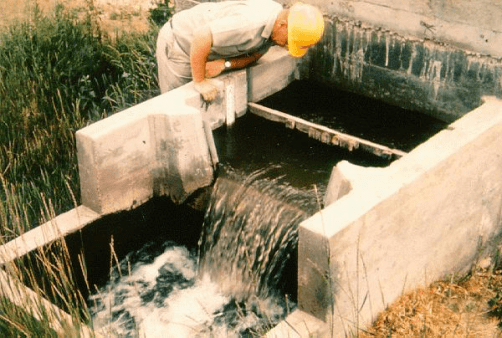
The photo above shows a ruler in tenths of a foot, held vertically on top of the weir boards.  This is called “sticking the weir”.  When the ruler is turned face-on to the flow, the water will climb up to the same level as the flat pool upstream of the boards.  It’s physics – standing water has an energy level equal to the height of the water surface.  Moving water has both potential and kinetic energy, so the energy level or line is above the surface of the

Sticking_Weir_zoom_sharpenedwater.  Moving water stalls behind the face of the ruler, giving the height of the water if it were standing still.  That is the water depth that has to be measured for weirs.  The photo is showing a water level of 0.31′ – it wobbles up and down just a little – so we know this weir is flowing at about 0.6 cfs per foot of width.

If the ditch is very flat and shows no ripples when flowing, it’s probably too flat, and an orifice or a flume will be needed instead of a weir.  Future posts will discuss those measurement devices, and others too.

Step 2 is figuring out how big a box is needed.  Fortunately, there is an easy rule.  1.0′ feet of width is needed for every cubic foot per second (cfs) that will be diverted.  For example, if the diversion will be a maximum of 3 cfs, then the diverter will need a 3′ wide weir.contracted_weir  If in doubt, get the next larger size since the cost is not much more.  The reason for this rule is that a weir can be accurate to plus or minus 5%, well within the accuracy needed for diversions in the field.  If the pool upstream of the weir boards is more than 0.45′ over the top of the boards (or less than about 0.1′ over the top of the boards), the accuracy of the weir is worse than the standard.

Measurement devices need to be planned and operated correctly to assure the diverter (and ditch-tender, and neighbors, and the State Water Resources Control Board, andsuppressed_weirpossibly 10 other state and federal agencies, and possibly even the Superior Court in the very worst case) that the flow measurement is correct.  It’s like a truck speedometer – they can get less accurate over time.  It’s no problem if they read faster than the driver is actually driving, but if they read slower, the driver is in danger of unknowingly speeding and getting a ticket.  Ouch.

The actual installation process is fairly simple to describe.  Get 1 to 4 yards of 3/4″ minus road base rock delivered on site, trucked from the gravel plant.  To save a lot of hassle, skip the forming up and pouring a concrete weir, and just call Briggs Manufacturing and order a weir to be delivered on site.  Dig a shallow, level (flat), square hole in the bottom of the ditch, about 8″ deep, and 1′ longer and wider than the bottom of the weir.  Shovel base rock into the hole about 2″ deep, and compact it.  Rent a gas-powered thumper, or use the bucket of the backhoe.  Pour another 2″ and compact it.  Use a level and make sure the top of the base rock is level side to side, and along the ditch.  Since it packed down during compacting, add the last 1″ and compact it, so the top of the road base is about 4″ below the bottom of the ditch upstream and downstream.

The installer needs to make sure to have a piece of 1″ steel bar that is about 1′ longer than the the width of the weir box.  There is one hole through the top of each side of the weir – stick the rod through that and hook onto it with a chain to lift the weir.  Set it in place, and make sure it is sitting level.  The installer might have to gently press down on one side with the backhoe to get it completely level.  Now the floor of the weir will be at the level of the bottom of the ditch.  Remove the steel bar, and fill the weir box inside about 2′ deep with some dirt.

Next, install the wing-walls, if needed.  These will keep the material on the outsides of the weir from washing out in a steeper ditch.  Then backfill with the remaining road base on the sides, compacting it for each 6″ of depth.  If tNew_Weirhe native soil holds water well, it could be used instead of base rock to backfill, saving a little bit of money.  Remember the dirt that was placed 2′ deep inside the weir?  This will keep the weir weighted down so it does not move during backfilling.  Also, it will keep the sides from being slightly bent in by the pressure of compacting the backfill.  The reinforced concrete weir boxes are strong but the walls can be bent in with enough force.

That’s it!  The weir box is installed and ready to go.  New weir boards, usually 2″ x 6″ or 2″ x 8″, should be cut about 1″ shorter than the width inside the board slots.  For example, a 3′-wide weir will have board slots about 2″ deep.  The full width from inside of board slot, to inside of the opposite board slot, is 3′-4″.  The boards should be cut about 3′-3″ long.  That way, when they swell a little bit, they won’t get impossibly stuck.

Happy measuring!  Good night to all, Merry Christmas, and blessings in the New Year.

How to Divide Up a Decreed Water Right – Part 2

This post is an old version and has been updated here: https://wordpress.com/post/allwaterrights.com/4949

…continued from yesterday’s Part 1….  To recap, in 2005, San Bernardinoans Arnold and Eileen Williamson bought property near South Cow Creek up in Northern California to retire on and build a new house.  They were set on drilling a new well and uncertainties in how much they could pump got them looking into their surface water right – do they have one for sure, and how much water is it?  They ended up taking their questions to an engineer who could answer their questions.  The map below is one of several from the report they got from the engineer, showing their property boundary on the 1965 decree map of irrigated lands:Ex_2_Williamson_Parcel_Outline_on_DecreeMap_reduced

The report cost $350.  They’re pretty sure they would have paid a lot more than that to see an attorney.  The engineer warns them that if it gets contentious and they can’t work out access to the water with their neighbors, they may end up having to get legal help.  He recommends Jeff Swanson if it comes to that – he’s an expert water rights laywer in Redding.  For now, though, they have documentation they can discuss with their neighbors to work on getting their water right to their property.

Their property is on land that back in 1968 belonged to Howard and Gladys Leggett.  It has an adjudicated second priority water right for irrigation equal to 0.063 cubic feet per second, or 28.5 gallons per minute, 24 hours a day, 7 days a week, from March through October.   This 2nd priority right is less than the second and third priorities on the upper creek and tributaries, but it is the highest irrigation priority on the lower creek.  Back when the property was flooded, that was usually enough to flood irrigate their entire lot to grow pasture or hay.  That’s great news!

As natural flows drop during the summer that amount is reduced and everyone with a lower creek second priority has to reduce their diversion by the same percentage.  In normal and wet years they could keep their pasture, hay, or whatever else they plant, irrigated for most or all of the irrigation season.  And whether or not they use the water, the right does stay with the land and protect their property value.

What else was in their report?  There was a cover letter, and next some excerpts from the decree.  Schedule 1 lists the places of use for all the original owners.  The Leggetts’ description takes up most of page 60; the Williamson’s property is on the 69.8 acres listed in the second paragraph for the Leggett land:

SCow_Sched1_Leggett_Places_Of_Use


Schedule 2 lists all the points of diversion, whether gravity diversions or pumps.  The Leggett property actually could get water from two diversions, a pump from the creek, and a proposed second, movable diversion on the creek.  That’s convenient – per the decree they could already divert their water from someone else’s existing diversion, or pump their water from Diversion 95, or they could get it from anywhere they can get agreement from the landowner!SCow_Sched2_Leggett_Points_Of_Diversion

SCow_Sched2_Leggett_Points_Of_Diversion_2

Schedule 6 lists the water rights for Lower Cow Creek – other schedules have rights for the upper creek and tributaries.  This is interesting: there are four priorities of rights and

SCow_Sched6_LowerSCC_Leggett_Allots_second_page

this part of the Leggetts’ property has a 1st and a 2nd priority right.  What does that mean exactly?  The decree explains that 1st priority rights are domestic – houses and gardens.  It’s a very small right and it is not clear whether or how it should be divided up among the all the subdivided parcels that used to be the Leggett ranch.  The engineer noted it in the cover letter.

How was the water right calculated for the Williamsons?  Using a geographic information system, or GIS, the engineer used his training and years of experience to precisely overlay the Assessor Parcel Map on the decree map.  Then he measured the acreage for both, and prorated the water right by area.  The following screenshots of the Excel spreadsheet shows these calculations.

TractMgmtSheet_20151222_Arial_12_01_reduced

TractMgmtSheet_20151222_Arial_12_02_reduced

TractMgmtSheet_20151222_Arial_12_03_reduced

Time to fess up: this was a water right subdivision of a made up parcel of land, and the Williamsons don’t actually own it.  However, this story is one that happens every day, when a landowner asks “How much is my water right, really?”  Having information before arguing with neighbors, seeing attorneys, sending legal letters, and going to court, can help smart people who generally have good relationships work out happy and agreeable solutions.  The Williamsons were smart and talked politely with their neighbors, the Turings and Poulens and Winters’s.  Now they have a good basis to live peacefully in their neighborhood for many years, and Arnold can borrow Charlie’s lawnmower until he gets his own.

Ex_2_Williamson_Parcel_Outline_on_Aerial_reduced

How to Divide Up a Decreed Water Right – Part 1

This post is an old version and has been updated here: https://wordpress.com/post/allwaterrights.com/4949

Back in 2005, Arnold and Eileen Williamson bought property near South Cow Creek in Shasta County.  They live in San Bernardino and plan to retire early, and build a new house on their land.  The parcel is part of an old ranch just off Highway 44.

The Williamsons paid $220,000 for the 3.55 acre lot.  That seemed high compared to similar parcels in the area, but they were assured the land has adjudicated water rights from South Cow Creek.

Arnold and Eileen brought their travel trailer to live on the land while they are building a new house.  Their savings account is in good shape so they are going to build a nice 2,200 square foot, single story ranch house with a garage and a shop.  They talked to a well driller 10 years ago and he assured them it would be easy to put in a well, for a cost of around $18,000.Williamson_Overview

When Arnold and Eileen went to get a permit to drill a well, they ran into unexpected problems.  Parcels on either side have their septic systems close to the common property lines, so their possible well locations are few.  Maybe a bigger issue is the passage of the Sustainable Groundwater Management Act in 2014.  Will their pumping rate be limited, and will their well-drilling permit application get held up?

Now the Williamsons are checking into their surface water right.  Is it enough for some pasture for horses and a few cows, in addition to the house and garden?  The Turings who live on the east side say there are no water rights.  The Poulans, to the west, say they have lived here for 6 years and they have never had water – they think the water right was bought off the place, or lost because of non-use.Williamsons_and_neighborsNow the Williamsons are upset and headed toward just plain mad.  The real estate agent said they had rights, and didn’t the title companies insure it??  After a few frantic calls, they found out that title companies don’t insure water rights.  But, their realtor gave them the number of some folks over on the north side of the highway, and they have a “decree map”.  Arnold and Eileen head over to the Winters’ place to look over the maps.  Brad and Jenny Winters even have the Internet address where the decree can be downloaded:  http://www.waterboards.ca.gov/waterrights/board_decisions/adopted_orders/judgments/docs/cowcreek_jd.pdfSCow_Sheet_5_screenshot

It turns out that the Cow Creek adjudication does not have maps, but an engineering report done a few years before the decree was issued does have the maps.  Brad and Jenny have that report, too, so they have Sheets 1 through 5 showing the “Diversions And Irrigated Lands” on Cow Creek.  Sheet 5 covers the area including the Winters and Williamson places.  Sheet 5 has a lot of “irrigated lands”Leggett_Focus_Area according to the legend – the green areas.

By looking at the maps, and their Assessor Parcel Map they have in their escrow package, it sure looks like their property is completely within the green area.  Great!  Now, how do they figure out if they actually have a water right?
AP_Map_59-98_croppedAfter asking around, Arnold and Eileen figure out they will need to see an attorney.  They call around and find out there are a couple of engineering companies that can see them faster, and they might cost less.  An appointment with Rights To Water EngineeringEx_2_Williamson_Parcel_Outline_on_DecreeMap_reduced   the next morning is their next step.  Within a couple of days, they have a nice report in their hands and answers to their questions.  So what did they find out?  That is an answer for the next post.

For now, good night to all….


Life Of Reilly: If You Can’t Measure It, You Can’t Manage It!

A friend of mine, Chris Reilly, summarizes everything you need to know about measuring flows into your surface water diversion:  “If you can’t measure it, you can’t manage it!”  Except for riparian rights and some very small water rights, diverted flows have to be measured.  Why?

Full_DitchFlooded_Field

Dry_DitchLegally, to ensure your neighbors, the Board, and/or a Superior Court Judge that you are diverting no more than your water right.  Practically, how do you know if you are getting as much water as you should?  As surface flows decrease through the summer, every bit less means some pasture, hay, orchards, row crops, or something else does not get irrigated.

If you have nWMM_Cover_smallever measured flow into a ditch before, well, here goes, I am going to leak the secrets right here, I’m going to violate the Unspeakable Code Of The Water Measuring Brotherhood, the ve
ry deepest, most powerful wisdom of how to measure your flow will appear on this very page.  After this, who knows if you will ever hear from me again, once this classified information is made public?  Well, not really, but few people have heard of the Bible Of Water Measurement, the
 USBR Water Measurement Manual (WMM)

Let’s look at 3 common measurement devices detailed in the manual:  weirs, orifices, and flumes.  Properly installed and maintained, these devices can measure flow within plus or minus 5% of the actual amount.  The photos below are from the WMM, which has lots of diagrams that make it easy to see the details of how each device works.  First, the weir:

WMM_weir

You have seen these before, they’re just a level plate or board of a specific width, with a relatively still pool behind them.  That’s it!  By measuring the height of the pool above the edge of the plate or board, you can use tables or equations from the WMM to determine what the flow is.

WMM_orifice

Above is shown an orifice.  Not much to see, is there?  In this case, it is just a hole, lower than the upstream flow.  That is physically all an orifice is.  Knowing the size of the hole, and how high the water is over the center of the hole, and how high the water is down the ditch, a table or equation can be used to figure out the flow.  The gentleman above is using a square gate with a certain width.  The area changes with how high the bottom of the gate is, not hard to figure out.

WMM_Flume_01

The photo above shows a Parshall Flume.  These are great for measuring high flows without needing a lot of “head” or the drop in the water from upstream to downstream.  By knowing the depth at a certain point, a table or equation can give the flow amount.

We’ll go into how to use tables for specific measurement devices in later posts.  It’s enough for now to know that if you have a decent measurement device, then you CAN manage your flow, as well as proving that you are taking no more than your legal water right.

Quick Change of Subjects: What’s a Water Right Permit Cost?

What does it cost to get a surface water right?  If your land is not riparian to the stream where the water is, or maybe one parcel is but your other 5 parcels are not, then you’ll need to file for a (Post-1914) appropriative right with the State Water Resources Control Board.

AlmondOrchard

Let’s say you want to irrigate 50 acres of new almond orchard in the Sacramento Valley.  How much water do you need for micros-sprinkler irrigation?  Let’s use the value for a 5-year-old orchard, about 3.33 acre-feet (AF) per year for irrigation and frost protection.  That number comes from the U.C. Davis Report Sample Costs To Establish An Orchard And Produce Almonds Sacramento Valley – 2012, at http://aic.ucdavis.edu/almonds/cost%20studies/AlmondSprinkleSV2012.pdf ,

The total annual volume of water for 50 acres is 3.33 * 50 = about 167 AF/year.  That equates to a constant flow of 0.03 cfs.  But, you probably irrigate one day per week, so 7 times the average rate = 0.21 cfs. So, in your permit application, you would need to apply for 167 AF/year, diverted at a maximum rate of 0.21 cfs.

To get the rate for filing for a permit with the Board, we need to check the fee schedule:   http://www.waterboards.ca.gov/waterrights/water_issues/programs/fees/docs/fy15_16_fnl_fee_schd_sum.pdf

SWRCB_fee_summary_permit_app

So your application fee would be $1,000, plus $15 per AF over the first 10 AF.  Your cost would be $1,000 + (167 AF – 10 AF) * $15/AF, for a total of $3,350.  There is also an annual cost:

SWRCB_fee_summary_permit_annual

Your annual fee would be $150 + $0.063 per AF over the first 10 AF.  Your annual cost would be $150 + (167 AF – 10 AF) * $0.063/AF, for a total of $160/year.

Of course, these costs are if it’s a “slam dunk” and there are no complications.  There would likely be a 1602 permit required by the California Department of Fish and Wildlife, and there could be other permits.  If anyone contests the application, then you would have more fees (see the schedule), perhaps attorney fees, and perhaps a negotiation to use water from someone else’s diversion.

Nothing Secret About It

A word on all the information discussed in this blog so far – it is all publicly available.  It is not all on the Internet, but it can be obtained by going to the right office or court.

For example, the South Cow Decree is available from the Board’s website.  That’s great!  However, last I checked, the maps are not available online, so a call to the Board might get you a copy or more likely, scanned PDFs of the maps.

http://www.waterboards.ca.gov/waterrights/board_decisions/adopted_orders/judgments/

swrcb_judgmentn_clip

If that doesn’t work, then a trip to the Shasta County Superior Court will be necessary.  This particular decree is not kept in a spot where a requester can wait in line.  A request has to be filled out, and then you go in a few days later, review the case box(es), note which pages you want copied, and pay for copies.

My last post (Permits and Licenses) listed what information is available on the Board’s website.  Additional information might be obtained with a phone call to the right person but folks at the Board usually have 5 times as much assigned as what they can get done.  A visit to Sacramento might be necessary to get all the info.

Ownership information is also publicly available.  It can be searched for free at the County Assessor Office, and in some counties, searched online, showing owners and sometimes even maps.  Various private companies make ownership information available, which is really handy if you want to know the owners and mapping of 10…or 100…or 1,000 parcels.   ParcelQuest is an excellent company, at parcelquest.com.  They have various purchase plans and subscriptions; last I checked, anybody with a credit card can get a subscription for $100/month ($150/month premium plan) and query and download ownership in any of California’s 58 counties.

I agree, it is unsettling just how much information is quickly available on each of us and our possessions.  Much of the information is free, and what isn’t can be had a little cost.  On the other hand, if you are trying to figure out what your existing water right is, or what the water rights are for land you might purchase, you can figure out half of it online in a few hours time.

A Place For Permits And Licenses

A Permit or License is required to hold Post-1914 water rights issued by the State Water Resources Control Board. An Application starts the process, then the right is permitted, and once proven, licensed.  This is the engineering summary of the process, not as precise or detailed as an answer from an attorney or a bureaucrat.

Let’s take a look at a license.  All of the information shown here is publicly available and it was downloaded from the Board’s website.  Note that the License has 3 identification numbers, all of which are important:

Application:  18405          Permit:  13122          License:  12363

From the language in the body, it is clear that the first use of water at this location was in 1958.  An Application was filed at some point, and proof of the claim was established in 1979 when the Board inspected the diversion.  A Permit might have been issued at the same time in 1979 – that information is not listed here.  Finally in 1988, the water right holder obtained the License.

A018405_ewrims_lic_pg1_purpose_amt


Now to the subject of this post, on Page 2 the Place of Use is listed.  The clip below shows the end of Page 1 and the start of Page 2:

A018405_ewrims_lic_pg1_pod_placeofuse

The place of use is defined as  1) at the reservoir, and  2) on 357.7 acres somewhere within 3 Sections, an area totaling about 1,900 acres.  The clip above also lists the point of diversion, and the purposes of use, but we’re focusing on the Place of Use right now.  Let’s go look at the map.

Whoops!  This License was downloaded as a PDF from the Board’s Electronic Water Rights Information Management System (eWRIMS) website at http://www.waterboards.ca.gov/waterrights/water_issues/programs/ewrims/index.shtml The thousands of downloadable permits and licenses in the database do not include the maps, as far as I have ever seen.  To get that, we would have to visit the Board’s office in the CalEPA building in Sacramento.

However, there is also an eWRIMS Geographic Information System (GIS), in addition to the database.  We can see the location of the diversion on either a  topographic map, or on an aerial photo.  Here’s what that looks like:

A018405_ewrims_map_w_aerial_256color_small

The pink text in the middle of the photo is where the GIS shows the diversion for this License.  What is the Place of Use?  That is not shown.  With some other information, like who owns the surrounding parcels of land, and maybe a telephone call to the owner, manager, or representative, we could probably figure out where the Place of Use is.

However, land can change hands so the owner shown on the license may no longer be correct.  Sometimes parcels get split up and one of the present-day owners pays for the permit covering the entire Place of Use.  It can get complicated without seeing the original hardcopy of the map.  The owner might not even have a copy of the map, especially if ownership has changed hands several times.  It’s good to memorize or keep on a Post-It the number for the Board: (916) 341-5300.

That’s enough for this post.  Stay tuned for upcoming posts on the Place of Use, Purpose of Use, Point of Diversion, and water right amount….