Converting Logger Pressure to Depth & Storage/Flows

If you have a pipeline as part of your diversion, then an in-line meter with an integrated data collector can be installed.  The data files from these units are

McCrometer McPropeller inline meter with data collector

easily readable in Excel, and the files can be sent directly to the Water Board to meet the requirements of SB 88.

What if you don’t have a pipeline?  Then your flow needs to be measured in the open ditch with a weir, flume, or orifice.  These devices measure the flow but they don’t record the data.  To continuously record data, a submersible logging instrument must be used to measure the water pressure at the bottom of the box.  These logging instruments are commonly put into stilling wells that are inside or outside the measurement device.

Flume with attached stilling well for water level logger

How are water pressure logger measurements converted to diverted flows or reservoir storage?  Why does anyone even have to have an electronic pressure logger?  Onset ComputerPMCIn-Situ, , and other manufacturers sell data loggers and water level loggers, not pressure loggers, so why is this post talking about measuring pressures at all?

Bluetooth Hobo Logger, cabled to recorder and barometric compensator unit – least expensive option for a single location


Loggers record pressure, because that is the easiest physical attribute to measure.  A data logger in water does not know how deep it is, and it does not

 know how much flow is going by, or how much water is being stored in a reservoir.  Pressures relate directly to static (standing) water depths, and then equations convert the depths to flows, or to reservoir storage volumes.

How is pressure converted to depth?  It’s an easy calculation – water that is one foot deep has a pressure of 0.4335 psi at the bottom.  So, if your logger measures 1.60 psi, then the calculation to get depth is 1.60 psi / 0.4335 psi per foot = 3.69 feet of depth.

Note that water level loggers can be of two types.  The least expensive are completely submersible, and do not compensate for barometric pressure.  For an idea of  the readings of barometric pressure in a measurement device, a 2 foot deep logger records a pressure of 0.8670 psi.  Atmospheric pressure at sea level is about 14.7 psi, and high in the mountains may be 12.0 psi.  Air pressure is much greater than those measured in ditches.  Usually two of these loggers are used at once, one in the water, and one out of the water measuring only air pressure.  This also eliminates the variability in pressure due to weather changes.

Stilling well in a weir

The second type of data logger compensates for barometric pressure at the same time water pressure is being recorded.  That way, the water and air pressure data sets do not have to be combined before conversion to depths.  These loggers were always more expensive until the Bluetooth Hobo water level logger came along; as of February 2019 I found that it is the least expensive option for a single location.

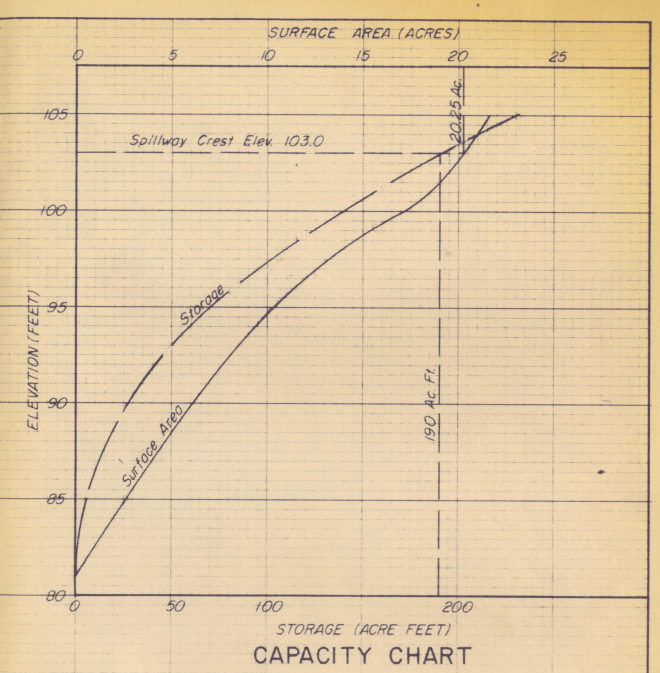
Now that you can calculate any depth, how do you convert depths to reservoir storage?  That requires an Area-Capacity curve, also known as an Elevation-Storage curve.  The points can be picked off the curve.  For example, in the curve below, a depth of 8.5 feet would correspond to an elevation of 2,802.5 feet, and a reservoir storage volume of 30 acre-feet.

An owner of a reservoir with a capacity over 10 acre-feet must collect monthly storage values.  That’s easily done by hand.  However, a reservoir with a capacity of 50 AF requires weekly measurement; over 200 AF requires daily measurement; and over 1,000 AF requires hourly measurement.  That is really tedious to do by hand.

This is where an Excel spreadsheet can make the task a whole lot easier!  The spreadsheets shown below are just for this.  The first sheet helps translate a graph into a table of elevations and storage volumes.  The second sheet translates collected pressure values into depth and storage values, for as many data points as needed.

For diversion ditches from a stream, how are pressures converted to flows?  The logger is in a stilling well, usually a pipe connected to the inside or outside wall of the weir, flume, or orifice.  It measures pressure, which is easily converted to depths.

As with reservoirs, Excel spreadsheets make the conversion process a whole lot easier.  The sheets below have the rating curve for a suppressed weir, and the second sheet converts pressure to actual water depths over the weir boards.  Even for thousands of hourly readings, the hourly flow volumes are quickly calculated and are ready to send to the Water Board: 

← Back

Thank you for your response. ✨


How Do You Record Diversion Data? Water Level Loggers, Value Vs. Costs

Recording is the other half of measuring diversions from streams, under California’s new water diversion measurement and reporting regulations.  Diverters are required by law to measure flows at frequencies based on the volume of water diverted in a year.  The flow has to be measured and recorded.  Of course diverters may not care about the data – it costs money and it doesn’t add income.  What you and I want in all of our purchases is the best value for the money.swrcb_flow_meas_frequency-edited

For very small diversions, flows have to be recorded weekly.  That may be easy to do depending on the location and access to the diversion.

Shawn_Sticking_WeirFor medium-sized diversions, flows must be recorded daily.  This is possible, but
it doesn’t allow for the owner or employees to have time off, travel, and so on.  At this level of recording, an automatic recorder of some type is necessary.  Large diversions must be recorded hourly, and automatic recording is the only practical way to be sure flows are recorded.  That is the subject of today’s post: automatic recording of flows, or what is really done most of the time, recording water levels and using equations to calculate the flow.

About_1.4_cfs_over_weir_edited_smallWe will leave aside the discussion of propeller, acoustic Doppler, magnetic, and other in-line meters.  If you have a diversion that goes through a long length of straight pipe, one of these devices can be bolted in or strapped on.  This post is about open diversions into a ditch, where an instantaneous measurement device (weir, orifice, flume) already exists…or may be installed soon.  These open devices do not measure flow directly, they measure the water level.  An equation is used to convert that level to a flow.

There are hundreds of devices (ready to go) and components (connected parts) to measure water levels.  There are also hundreds of loggers that collect data.  Here, we will look at 4 water level sensors connected to data loggers, called water level loggers.

Onset has a neat Bluetooth Hobo water level logger.  This may help  to satisfy the Water Board’s telemetry requirements starting January 1, 2020; the data must be updated weekly on a website, and downloading data weekly is easier with this logger.  We’ll see what the Water Board says as this rolls out.  The MX-2001, with the cap removed, hooks up to the MX-2001-TOP with a cable, and once installed, is downloaded with the free Hobomobile smartphone app.  The app does everything you’d normally need a data shuttle and cable for – starting, setup, configuration, downloading, and stopping the logger.


The top unit with the Bluetooth radio has to be out of the water, so of course the top of the stilling well holding the unit has to be 1.0 feet or higher up out of the water.  If the stilling well is galvanized iron pipe, you’ll need to get within a few feet to download it.  If you are using PVC you might get a connection at 100 feet.

Will two units close to each other interfere?  Nope, the app finds both and lets the user choose which unit to work with.  As with any water level logger installation, keep a logbook or spreadsheet with the Serial Numbers for each location so you aren’t confused later.

What about barometric pressure?  The TOP unit records barometric pressure, so you don’t need a second unit for atmospheric pressure, nor do you have to know the elevation difference between two separated units.  The unit subtracts atmospheric from absolute pressure, then gives you all 3 values when you download:  absolute, atmospheric, water only.  That makes data processing much easier.

In California, you should be able to get one of these shipped to you for $750.  Compare that to the regular Hobos, which need one in the air, one in the water, and a data shuttle and cable.  It would put you back almost $1,000 to get the separate pieces shipped to you.  If you have two or more locations to log, then the old style is less expensive as far as parts go.  Still, the Bluetooth version is likely more cost effective when you consider the minutes saved each time the Bluetooth unit is downloaded, compared to unlocking or unscrewing the cap, getting the water unit out, downloading it, and replacing the cap or lock.

The next is a setup that rancher and retiraqua-plumbed aircraft engineer Frank Crowe uses.  Frank’s desire was to save him and his neighbors money, so he put together the Vegetronix Aqua-Plumb Water Level Sensor connected with the Logger-8-USB.  Together these are $340, which is
the least cost of anything that I have seen.  Add shipping, tax, logger-8-usb
and $60 in other parts and batteries, and for $450 you’ll have the parts you n
eed for moderately durable, reliable, and accurate water level logger.  Not only that, but 
the Logger-8-USB has 8 channels altogether, so a diverter could measure up to 8 water levels at once by adding 7 more sensors at $95 apiece, not including tax and shipping.

Here is Frank’s latest setup with his comments: “Finally was able to put together a prototype package for the vegetronix_frank_1_p1300077vegetronix_frank_2_p1300078Vegetronix sensor.  The box is a little bigger than needed, but seems to work.  I’m trying to get the data to download into something I can analyze, but it seems to work very stable.

The pipe is 3/4″ mounted to the box, with the sensor wire going down to about an inch from the bottom and then returns up over 12″, therefore doubling the sensitivity.  The end is held by some wire at the moment, but would probably work better with a stainless steel spring.  The top of the pipe is not sealed, but should be to keep the humidity out of the box.  Of course if the data logger were in a separate box, the seal would not be necessary.

To exercise the thing, it is stuck into a 3″ pipe with a water drip going in and a drain at the bottom.  The overflow hole is 13″ above the bottom.”

So, what is the trade-off?  If you are handy, somewhat experienced with electronic components, and willing to spend some hours, you can set this up yourself.  Frank can help a few of his neighbors, but he has his family and ranch requiring his time, too.  Otherwise, it is going to cost a couple hundred dollars or so for someone to set this up for you.  It needs to be checked, maintained, and adjusted more often than the integrated water level loggers, too, so the maintenance and downloading cost can be $50 to $100 per year if everything is working well.

Next, the Onset Hobo U20L-04 Water Level Logger is $300 before shipping and tax.  The DWR Groundwater folks I worked with for years, use these in groundwater wells.  They are easy to set up – program one and place it in a stilling well.  Take it out once or twice a year to dowonset_hobo_u20l-04-editednload the data.  The battery life is 5 years, maybe more.

Why aren’t these automatically the cheapest option?  They may be the cheapest if a diverter has 2 diversions or more, or several neighbors are using the same Hobo U20L-04.  However, they are not vented, meaning that as atmospheric pressure changes due to low pressure areas and storms, the device’s pressure reading will not be as accurate.  Therefore  Onset recommends having a second U20L-04 set up outside the water to measure the pressure change over time.  The second device can be some miles away, so one outside calibration device could be used for several in the water within a 100-square-mile area.

What I heard from colleagues is that these did not last for 10 years, and often not for five years.  Durability and reliability of a device are important for uninterrupted data, and therefore compliance with the Water Board’s regulations.  The more often onset_u20l-xx_handhelda device has to be replaced, the more it costs over time.

A download shuttle and cable are also required to get the data from the Hobo to your computer – delivered cost about $300.  In summary, the delivered cost of two Onset Hobo U20L-04 devices and the download kit is about $1,000.  This cost may be reduced somewhat if the cost of a calibration device can be shared between several diverters, or several diversions.

The third device discussed here is the Global Water WL-16.  This is an integrated, vented device, designed to program and set in a pipe.  Watermasters have used these for years at various diversions.  The delivered cost is about $900.global_water_wl16-edited

The WL-16 has a stainless steel casing and is fairly tough.  They should last a good 5 years.  The problem is at the sensor end – it is relatively easy to clog up in warm-water conditions, with algae and/or silt.  In cool flowing water, it might operate for the whole irrigation season.  In warmer or still water, it will have to be checked and sprayed clean every 1 to 3 months.  Watermasters have put the sensor ends in distilled water in baby-bottle bags, and rubber-banded the tops of the bags closed to keep the sensors clean for the entire irrigation season.

One other concern which I have not discussed with the manufacturer – the manual for the WL-16globalwater_wl16_in_field was updated in 2009 and refers to Windows XP, not the current Windows 10.  I am sure that a newer manual is sent out with the device when it is purchased.  Overall, with some care to check the sensor end and clean it as necessary, this is a great drop-it-in-and-turn-it-on option.

The fifth water level logger discussed here is the PMC Versaline VL2111 – WLS-31 Water Level Datalogger.  This looks much like the WL-16, but instead of a silicon bladder at the end of sensor, it has a non-fouling ceramic sensor.  At $1,370 before tax and shipping, it has the highest purchase cost of the 4 listed in this post, but it is my recommendation for durability, reliability, and low maintenance.

pmc_vl2111-with-wls-31-datalogger

The Versaline is made for wastewater; in other words, for sewer lines.  The datalogger end is vented and it is not supposed to be submerged, same as the Vegetronix components and the WL-16.  However, it is made to put inside manholes where it is very warm and humid.  The PMC guys have maintained the sensor end in rough environments with the equipment lasting 8 to 12 years.  If the sensor gets completely covered with algae (or something worse), it still works.  It can be cleaned off with a toothbrush if it seems so clogged it might prevent water from getting to the ceramic end.  The data logger and sensor are fairly new but are improvements on the older, long-lived versions.

The VL2111 – WLS-31 is three times the cost of the least-expensive option.  However, it might be the least expensive in the long run…it sure is the most worry-free of all the options listed here!

Do Something Wrong, Instead Of Nothing Right

Do something wrong, rather than nothing at all. Have you ever heard that before? I have heard it from Army veterans, a boss, even an elder of a church.  George Patton said, “A good plan violently executed now is better than a perfect plan executed next week.”  A non-military way to say that is, “A poor plan now is better than no plan at all.”

What it means to you and me is, if action is necessary, do something, maybe ANYthing, rather than freezing in place or ignoring a problem. This is obvious when you see a tornado 5 miles away, for example; either drive away from it if you are in a car, or take shelter if you are on foot. If you have a plumbing leak in the house and no parts to replace broken pipe, then put a bucket under it, or turn off the valve, and call a plumber. All of us have seen a TV show (or maybe had it happen to us) where the bad guy pointed a rifle and said, “Don’t move”. What do we all say to the TV? “Don’t just stand there, run!”. Doing nothing is a much worse choice, if the result for freezing in place is death or injury.

Ready-to-install 3-inch Montana Cutthroat Flume

What about water rights – how does doing something wrong help? Everyone knows by now that surface water diverters need measurement devices, so put in a weir box and boards and measure your flow before the threats come from the Water Board, your watermaster, your ditch tender, or your neighbor.  Even just stick horizontal boards in a ditch and seal the sides with plastic – something to take positive action to reduce future pain.

Remember to file the information for the measurement device with the Water Board, either via your annual report of diversions, or using the Water Right Form and Survey Submittal Portal.

Take a look at the blog posts below.  There is enough information and how-to directions, that you should be able to do it well enough to satisfy the Water Board.  Check out these posts:

There is a philosophy based in law and a lot of experience, that says don’t put any controls on yourself until the court or government makes

Temporary Weir In Ditch

you. Why remodel your house to accommodate the wiring or plumbing, if you aren’t selling the house and everything works okay right now? Who would put a lot of money into an old truck to make it pass smog, if it just might pass a smog check the next time it has to be done? What farmer would change how he irrigates or ranches if everything still operates and the bank will keep making operating loans?

All of the Water Board deadlines have passed to install measurement devices, or file Alternative Compliance Plans.  If you haven’t got your device or plan done yet, get a Request For Additional Time done as soon as possible.

Be proactive.  Take some inexpensive, temporary action.  Educate yourself for free with some time in the Internet. Even a small, less-than-perfect improvement in your measurement device, flow and water use record keeping, can pay back a lot more when you have to deal with potential Water Board fines, a court case, or even just an angry neighbor in the future.

File Logger And Meter Data In 2019, With Annual Reports

Diverters and reservoir owners have been wondering, when is water level logger or meter data supposed to be filed with the Water Board?  I checked with Jeff Yeazell, our public contact at the Water Board.  Folks will be able to file data with their annual reports in 2019, so you’ll do it while you are already in the Report Management System to file your Reports of Licensee (due April 1) or Supplemental Statements (due July 1).  The new forms will likely be available in January of 2019.

Jeff is a great guy, knowledgeable, very responsive, and easy to talk with, so you can be reassured you’ll get a response and most likely an answer if you contact him.  His email is Jeffrey.Yeazell@waterboards.ca.gov and you can call him at (916) 341-5322.

https://public.waterboards.ca.gov/WRInfo/ :

How To Survey A Reservoir

Pond In Mountains, Photo Credit: Pixabay
Pond In Mountains,  Credit: Pixabay

If you have a reservoir, the Water Board requires you to measure and report: how much you divert to it, how much water you store in it by month, and how much water you release if the pond has a controllable outlet.  It is usually not possible (or at least not feasible) to measure the inflow, so what is actually reported is the monthly positive change in storage, the amount that fills it up.

If your reservoir is less than 10 acre-feet (AF) per year, you only have to report it.  Measurement is not required.

How do you know how much is stored in your reservoir?  Each pond needs an elevation-storage table or curve, as the Water Board calls it.  Engineers call it an area-capacity table or curve – that’s what I created during part of my career as a water bureaucrat.  I’ll use the Water Board’s terminology here since water diversions and storage are reported to them.

First check to see if the Water Board or Division of Safety of Dams has an inspection report for your reservoir.  If not that, then an elevation-storage table or curve may be available.  You can have it emailed as a PDF.  If there is no information for your reservoir, then you have to create the table and curve yourself.

First a reservoir has to be surveyed, so you know how full it is for any given elevation of water.  The elevations start at zero storage.  The figure below shows a cross section and the contour map for a reservoir with a minimum elevation of 86 feet.

Pond Contours. Photo Credit: civilblog.org
          Pond Contours,  Credit: civilblog.org

How do you survey a reservoir?  You could hire an engineer or surveyor to survey it.  Depending on your budget and your need for accuracy, the elevation-storage table from a survey could be anywhere from +/- 5%, to +/- 10% accurate.  The Water Board requires +/- 10% for larger reservoirs, and +/- 15% for 100 acre-foot (AF) or smaller reservoirs.  I recommend aiming for +/- 5% in case you have significant errors elsewhere in the measurement system.

On the high end, the survey could be done using GPS survey instruments, so the result could be accurate and could overlay other digital maps.  Almost as high a cost is to have a transit with EDM (electronic distance measurement).  Robotic units only require one person acting as the rodman, and the instrument “follows” by keeping pointed at the laser prism reflector.

At the bottom end of the scale, a survey level or possibly a hand level, and a couple of 100′, 200′, or 300′ tapes can be used.  Many survey levels can read horizontal angles within a degree or two, so the instrument person can note angle and distance to every point.  If angles are not used, then two tapes are used, one to measure the distance along a side, the other to measure perpendiculars out to the rodman.  In the boat, the rodman measures depths, and on land he has a telescoping level rod to get elevations above the Photo_0188water level.  This way you measure X and Y distances that are plotted on a grid along with each point’s elevation or depth.
With plotted points, now you can draw contours for every foot, or every two feet, or every five feet, depending on the size of your reservoir.  Then calculate the area for each contour, and the volume between each set of contours.

Here’s where Google Earth can be your best friend.  Navigate to your property and reservoir in Google Earth.  Then take a digital photo of your contour map, and import it into Google Earth as an image overlay.  Make it 50 percent transparent, and move and resize the image until it fits over your reservoir.  Now you can use the polygon tool, trace over your contours, and let Google Earth calculate the areas for you!  Make sure to get those areas in square feet or acres and not square miles.

An alternative way of doing this is to print out a map of your reservoir from Google Earth, then draw your survey points and contours right on that map.  Then when you import the scanned or photographed, edited map, it will be a lot easier to overlay on your reservoir.

Make an elevation-storage table and draw an elevation-storage curve like the one below.

Let’s look at an example.  To get the reservoir volume, add the areas of two adjacent contours, say, the 90-foot contour and the 92-foot contour, divide by 2, then multiply by the elevation difference (in this case, 2 feet).  If the 90-foot contour has an area of 6.1 acres, and the 92-foot contour has an area of 7.6 acres, the calculation is [(6.1 + 7.6)  / 2] * 2 = 13.7 AF.

190-AF Reservoir Capacity Chart

Here’s the great thing about simple methods: anyone can measure his own reservoir by reading up on it first (Google, Bing, or DuckDuckGo) and then taking some care (and good notes) to do the job well.  If the topography is difficult, or the pond is too large for tapes, or you are just too busy doing the work you have to get done, then talk with an engineer and negotiate cost vs. quality and accuracy.

← Back

Thank you for your response. ✨

Great AB 589 Self-Certification Training!

I attended the Flow Measurement Devices and Methods course in Cottonwood yesterday, for diverters to become a “qualified individual” per AB 589.  What a great class!  All my appreciation and applause to Larry Forero, Allan Fulton, and Khaled Bali of the UC Division of Agriculture and Natural Resources, who taught the course.  They laid out the requirements and the details of several ways to comply with SB 88, including weirs, flumes, water level loggers (pressure transducers with data collectors), in-line meters, in-line differential pressure, how to determine and track reservoir volume, and how to report changes in volume.

There were specific examples of how to size a weir to install the correct device, how to convert measured flow rates to the volumes that must be reported to the Water Board, and how to select an inline meter if your diversion is piped.  There were detailed examples of how to comply with the Water Board’s reporting requirements, and discussion of the most relevant parts of SB 88.

I hope that Larry and Allan will make their Powerpoint presentation available online for public use.  It is well done and really helps understand how to comply with SB 88, both in the field and online at the Water Board.

Update:  Allan Fulton contacted me and let me know that this course IS accepted by the Water Board!  So sign up, take the 3-4 hour course, and you will be certified to install your own measurement device(s).

I heard a week ago that it isn’t a 100 percent lock that completion of the course will be accepted by the Water Board.  However, the course is more than adequate in my estimation, and I don’t think the Water Board has any alternatives to comply with AB 589.  It is going to be accepted!

AB 589 says, in part:

“…any diverter who has completed an instructional course regarding the devices or measurement method included in the course administered by the University of California Cooperative Extension, including passage of a proficiency test before the completion of the course, shall be considered a qualified individual when installing and maintaining devices or implementing methods of measurement that were taught in the course for the diverter’s diversion.”

Thanks to the Shasta Livestock Auction Yard for providing the location – my guess is that there were 140 people attending, a good crowd for this narrow subject.  The Cattlemen’s Association got the word out and provided refreshments.  It was hundreds of hours of work among 8 people or so to pull this off.  Job well done, everyone!

Converting water logger pressures to depths to storage or flows

How are water pressure logger measurements converted to diverted flows or reservoir storage?  Why does anyone even have to have an electronic pressure logger?  PMC, Onset Computer, In-Situ, , and other manufacturers sell data loggers and water level loggers, not pressure loggers, so why is this post talking about measuring pressures at all?

Most “loggers” record pressure, because that is the easiest physical attribute to measure.  A data logger in water does not know how deep it is, and it does not know how much flow is going by, or how much water is being stored in a


reservoir.  Pressures relate directly to static (standing) water depths, and then equations convert the depths to flows, or to reservoir storage volumes.


How is pressure converted to depth?  It’s an easy calculation – water that is one foot deep has a pressure of 0.4335 psi at the bottom.  So, if your logger measures 7.00 psi, then the calculation to get depth is 7.00 psi / 0.4335 psi per foot = 16.15 feet of depth.

Now that you can calculate any depth, how do you convert depths to reservoir storage?  That requires an Area-Capacity curve, also known as an Elevation-Storage curve.  The points can be picked off the curve.  For example, in the curve below, a depth of 8.5 feet would correspond to an elevation of 2,802.5 feet, and a reservoir storage volume of 30 acre-feet.

An owner of a reservoir with a capacity over 10 acre-feet must collect monthly storage values.  That’s easily done by hand.  However, a reservoir with a capacity of 50 AF requires weekly measurement; over 200 AF requires daily measurement; and over 1,000 AF requires hourly measurement.  That is really tedious to do by hand.

This is where an Excel spreadsheet can make the task a whole lot easier!  The spreadsheets shown below are just for this.  The first sheet helps translate a graph into a table of elevations and storage volumes.  The second sheet translates collected pressure values into depth and storage values, for as many data points as needed.

How are pressures converted to flows?  The logger is in a stilling well, usually a pipe connected to the inside or outside wall of the weir, flume, or orifice.  It measures pressure, which is easily converted to depths.

As with reservoirs, Excel spreadsheets make the conversion process a whole lot easier.  The sheets below have the rating curve for a suppressed weir, and the second sheet converts pressure to actual water depths over the weir boards.  Even for thousands of hourly readings, the hourly flow volumes are quickly calculated and are ready to send to the Water Board: 

← Back

Thank you for your response. ✨

How Do I Measure And Report My Reservoir?

I have talked to a few hundred people about reservoirs over the last year.  How is a reservoir different from a pond?  What size has to be measured?  If you have a reservoir, how do you measure it?  Can a 15 acre-foot pond be measured the same way as a 1,500 acre-foot reservoir?  I have been estimating the storage for years, can’t I just keep doing that?

A reservoir is man-made, and may or may not have a pipe outlet.  “Pond” is a more general term and does not signify whether the body of water is natural or man-made.  Reservoirs include everything from less than 1 acre-foot stock ponds with a dam a few feet high, to Shasta Reservoir (Lake Shasta).

Every reservoir over 10 acre-feet has to have its storage volume measured monthly or more often, up to hourly for 1,000 acre-foot and larger reservoirs.  How is that done?  We’ll get to that in a few paragraphs.  Here is the table from the Water Board that specifies diversion amounts, storage amounts, compliance deadlines, accuracy, monitoring frequency, and who can do the work.  Personal gripe:  Hey, Water Board web design folks, your web pages are dang hard to see for folks that are over 50!  I had to modify the screenshot just so folks can see the rows and columns.

NOTE:  if you take the new class that the U.C. is putting together, you can install and certify your own measurement device(s)!

How can you comply, and what has to be done?  There are thousands, or tens of thousands of ways considering every permutation of each option, but I am going to list the four main ones that I use, from cheapest to most expensive:

  1. Alternative Compliance Plan – This is doing something besides standard compliance and still coming up with accurate-enough storage values at the
    Pond – photo credit: publicdomainfiles.com

    necessary frequency.  Within an ACP are thousands of possibilities, but the simplest case is a 10 acre-foot reservoir 3 driving hours away from the ranch house or first gate, not accessible in the winter.  An ACP for this often boils down to this: it is a landscape feature, no action of man is needed to fill or drain it, livestock and wildlife rely on it, it takes most of a day to get there and back, and a data collector is likely to get stomped on if cattle or elk can ever get to it.  This is the “I’m just going to keep estimating it and that meets everyone’s needs” option, and I think it is valid in a fair number of cases.  Just see some of the ACPs I have filed.  An ACP is harder to justify at the large end of reservoirs, but it might include things like occasional drone flights, using CIMIS data for evaporation, perhaps only measuring the outlet some distance downstream of the reservoir while estimating storage, and so on.

  2. Run a tape measure or long plastic tape from the edge of the dam road, down to the water’s edge, once a month or whatever the necessary frequency is.  This requires getting the inspection report, or at least the area-capacity curve from the Water Board.  You need two pieces of information: the slope of the water-side dam surface, and the storage volume at a few intervals of depth.  Most small reservoirs that I have seen have a water-side dam slope of 3 feet horizontally to 1 foot vertically.  Area-capacity curves can vary, and in the rare case where the Water Board or the Division of Safety of Dams does not have a curve, you’ll need to do a survey of some depths to generate contours and make the curve.
  3. Install staff gages.  This involves driving or setting lengths of 2″ galvanized pipe that overlap vertically with the next pipe up-slope or down-slope.  Then 2″ x 6″ lumber and 3′ or longer gages are bolted to the pipe, using a survey level to make sure the 5-foot mark, for example, at the top of one gage matches the 5′ mark at the bottom of the next-higher gage.  This can cost a few hundred or a few thousand dollars, depending on how much work you do vs. hiring work out, access, depth of the reservoir, and so on.  Oregon Rule is one good company to get the staff gages.
  4. Install water level loggers to collect pressure data, and convert the data to depths, then to elevations, and then to storage volumes, after the data is downloaded.  This is standard compliance.  What if you don’t have power lines to the dam?  There are many data loggers that run on batteries, for times of 2 years up to 12 years.  I mostly use the Onset Hobo and PMC Versaline water level loggers.  Hobos are put in protective, short PVC lengths, with a moderate weight, a rope, and buoy, and then setting them at the deepest part of the reservoir using a boat.  Data is downloaded by boating out, hauling up the Hobo, and putting it back in the same place.  This is easy if a heavy weight is attached by a second rope to the same or a different buoy to keep the location constant.  The PMC Versaline keeps the data collector on shore, with a cable to the water level logger.  It is installed in whatever length of PVC pipe is needed to get from the dam at a point above where any water gets, down to the logger end.  Then, no boat is needed to download data.  Which option is better?  See some of my earlier posts on the specifics of water level loggers.

Those are brief explanations, but you can find the detail in earlier posts on my blog, and some other blogs.  Does this help you?  Please let me know, whether yes, no or maybe!

← Back

Thank you for your response. ✨


[Update/Repost] Do Something Wrong, Instead Of Nothing!

Do something wrong, rather than nothing at all. Have you ever heard that before? I have heard it from Army veteran friends, a boss, even an elder of a church.

What it means to you and me is, if action is necessary, do something, maybe ANYthing, rather than freezing in place or ignoring a problem. This is obvious when you see a tornado 5 miles away, for example; either drive away from it if you are in a car, or take shelter if you are on foot. If you have a plumbing leak in the house and no parts to replace broken pipe, then put a bucket under it, or turn off the valve, and call a plumber. All of us have seen a TV show (or maybe had it happen to us) where a bad guy or an enemy pointed a rifle and said, “Don’t move.”. What do we all say to the TV? “Don’t just stand there, run!”. Doing nothing is a much worse choice!

Man working in ditch CostaDisc2-129 - EditedWhat about water rights – how does doing something wrong help? Everyone knows by now that surface water diverters need measurement devices, so put in a weir box and boards and try to measure flow if the Water Board, your watermaster, or your neighbor is promising painful consequences. Even stick boards in a ditch and seal the sides with gravel – something to take positive action to reduce future pain.

Take a look at the blog posts here.  There is enough information and how-to directions, that you might be able to do it right!  Check out these posts:

There is a philosophy based in law and a lot of experience, that says don’t put any controls on yourself until the court or government makes you. Why remodel your house to accommodate the wiring or plumbing, if you aren’t selling the house and everything works okay? Who would put a lot of money into an old truck to make it pass smog, if it just might pass a smog check the next time it has to be done? What farmer would change how he irrigates or ranches if everything still operates and the bank will keep making operating loans?

Surface water and groundwater are getting 10 50 times the attention they were prior to 2009. If the Water Board, or California Fish and Wildlife, or any other agency comes along, do something, anything, to comply sooner, even if it’s not the ultimate solution. Two posts ago, bureaucrats were discussed – they are still human beings and most people appreciate some effort to “get with the program”.

Be proactive, take some inexpensive action, educate yourself for free with some time in the Internet. Even a small, less-than-perfect improvement in your measurement device, flow and water use record keeping, diversion practices, or acreening, can pay back a lot more when you have to deal with agencies, a court, or an angry neighbor in the future.

Alternative Compliance Plans – First Batch Is Online

Many people have asked about Alternative Compliance Plans filed with the Water Board.  Have any been approved?  Do I have any feedback regarding the ones I filed?  What will work, and what won’t?

In short, I have heard nothing from the Water Board, so I have no answers.  However, the Water Board has started posting them online.  See the screenshot below – I erased the water right holders’ names, you can see them and download them at the web page.

← Back

Thank you for your response. ✨